A material certificate, also known as a mill test report (MTR) or a mill test certificate (MTC), is a quality assurance document in the metals business. It validates technical parameters such as chemical, mechanical, or other physical attributes, manufacturing processes, heat treatment information, testing findings, or conformance with a set of international or local standards. This article reviews the material certification process and reveals the differences between forms 2.1, 2.2, 3.1, and 3.2.
Material Certification Process
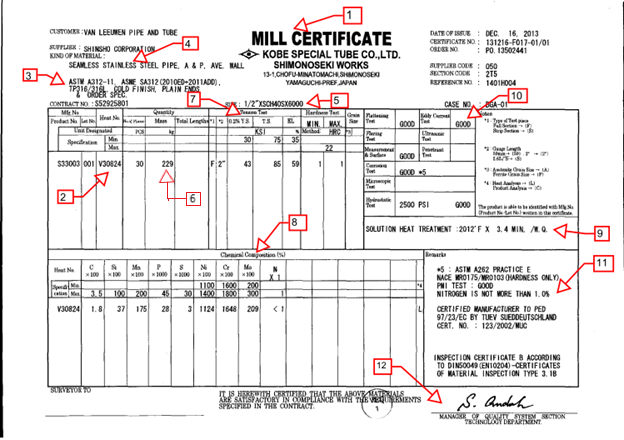
While each material certificate typically has a different report layout, their information is universal. Thus, this guide of how to read material certificate explains each relevant field.

1. Manufacturer
First, the material certification provides the manufacturer who made the product such as a pipe, tube, and shape. The material certificate shall state the company’s name or workshop, location, certificate compliance. Additionally, it may include product markings such as the company’s name or company’s logo.
2. Material Heat Number
The material heat number provides the primary traceability method for a given material. Thus, the metal’s matching heat number must match the heat number on the certificate. This includes any supporting paperwork and any markings on the material’s surface.
3. Material Grade and Specification
Next, the material grade is a metal classification system based on its chemical and physical qualities. According to the sample material certificate, the material is 316/316L stainless steel. The ASTM and ASME standards applied to a given material are product specifications. Metals used in pressure and vacuum applications, for example, must meet strict product criteria. The letter “A” appears in ASTM standards, while “SA” appears in ASME standards.
4. Delivery Condition
The material certification report also includes the delivery condition. This categorization refers to how a product is made, whether hot or cold finished, seamless or welded. Abbreviation marks include:
- SMLS – Seamless,
- W – Welded (RT or UT)
- WX – Welded (100% RT)
- WU – Welded (100% UT)
- The inspection report should attach to MTC if RT/UT was performed for the welded seam.
5. Material Dimensions
The listed material dimensions depend on the raw material and varies. For example, metal plates measure by thickness, whereas pipes measure by diameter. In the example material certification, the material is plate and labeled by thickness, width, weight, and length.
6. Weight
Weight is defined as the mass per unit of length. The marking for pipe bigger than NPS 4 must contain the weight if required in the purchase order.
7. Mechanical Properties
Mechanical properties provide required strength properties and their compliance to the required properties. This section may also require other mechanical properties such as hardness and grain size.
8. Chemical Analysis
The chemical analysis field of the material certification form validates the alloy makeup. It also includes details of alloying properties that validate a material’s suitability and compliance to the required client and/or project specifications.
9. Heat Treatment
Heat treatment refers to a specific heating or cooling process, usually to extreme temperatures, a material undergoes. The reviewer will also go over the product specification and ensure all techniques are correct. In the above example, the material was held at a temperature of 2012F and then water quenched.
10. NDE Testing, Hydrotest, Etc.
The details of material testing present in this section. All pressure retaining pipe shall be hydrotested unless extenuating circumstances apply (i.e. golden weld).
11. Supplementary
The supplementary section includes any detail specified in the purchase order, such as a PMI test, complied with NACE MR0175, Intergranular grain.
12. Certified Mill Signature
At the source mill, the responsible employee submits the certified mill signature. Also, the employee signature attests to the accuracy of the information in the certificate.
Material Certificate 2.1
The material certificate 2.1 provides a declaration that the supplied products comply with the order’s requirements. However, this form 2.1 does not require the inclusion of test results.
Material Certificate 2.2
The material certificate 2.2 provides a manufacturer’s declaration that supplied products comply with order requirements. Form 2.2 differs from 2.1 as test results are provided. These testing results derive from a non-specific inspection and the manufacturer. In short, the manufacturer determines the tests without outside counsel or requirements.
Material Certificate 3.1
The material certificate 3.1 is issued by the manufacturer and provides a declaration that the supplied products comply with the order’s requirements and offer test results. Moreover, the required tests are defined by the product specification, the official regulation, and corresponding rules and/or the order.
The document is validated by the manufacturer’s authorized inspection representative, independent of the manufacturing department. Also, the manufacturer may transfer to the material certificate 3.1 relevant test results obtained by specific inspection on primary or incoming products. Moreover, this holds true only if the manufacturer possesses traceability procedures and can provide the required corresponding inspection documents in the event of an audit.
Material Certificate 3.2
Preparation of the material certificate 3.2 occurs by the manufacturer’s authorized inspection representative, independent of the manufacturing department, and either the purchaser’s authorized inspection representative or a designated inspector.
They declare that the products comply with the order’s requirements and include test results. Like form 3.1, the manufacturer may transfer to the inspection certificate 3.2 relevant test results obtained by specific inspection on primary or incoming products. Also like form 3.1, the manufacturer must operate traceability procedures and provide the corresponding inspection documents as required.
Material certificate 3.2 requires countersigning by an independent inspection authority. This differs from form 3.1, which requires only a company representative that’s independent of the manufacturing process.


